Since we were often held hostage to our princess watching her man Diego, we decided that it would be fitting to dress up as her favorite adventure duo.
This is a super easy couple costume to pull together, the only things I made were the backpacks.
For Diego:
Light blue short sleeve t-shirt
Dark blue shorts
Dark tan fishing vest, attach logo (below)
*Print out the logo at 3" x 3" on thick cardstock. Cut out the logo. Use spray glue to attach to left side pocket on the fishing vest.
For Dora:
Dark pink shirt
Golden rod or orange shorts
White shoes
Yellow socks
Hair: straighten and curve into a bob
The Backpacks:
I really just created these backpacks as I went, but I will try to explain how they went together as best I can :)
Dora's Backpack
The shape is basically a rectangular box, with the top side left open.
The panel measurements:
Two panels (front and back) that measure 10" x 15"
Two panels (sides) that measure 3" x 15"
One panel ( bottom of bag) that measures 3" x 11"
*I have color coded the different panels, hopefully this will help the sewing make more sense in how I explain everything.
Here is a view of the corner of the bag, again it was a very rough and quick version of a box-y bag.
I started with one panel, and sewed two sides along the length of the panel.
Then I sewed the other panel opposite of one side. It should now look just like the diagram above. Now place front sides together and sew the outside edges together. You should now have a three dimensional rectangle box, with no top or bottom.
Then comes the tricky part, which is getting the bottom on. Keep the box inside out, and stand it on end. Fold back 1/4" of fabric and pin. Position the bottom panel evenly on the end of the box, and pin the panel edges to line up with the folded edges that you already have pinned back. The panel edges and the pinned edges should now be pinned together.Take one edge at a time, and sew together along where you have pinned, at 1/4" back from the edge. When you finish, turn the box right side out, and you should have a rectangular shape box-y bag with no top.
The straps measure 6.5" x 7", i sewed the 6.5" sides together and turned them inside out to created a more realistic looking strap. I sewed on an extra piece of ribbon for decoration, but if I did the backpack over again, I would just make the 7" length into 18" or maybe longer.
Once you have made the straps, set them aside while you cut out the top flap. You are welcome to get more creative with it, but on this bag I simply cut out a (very uneven and wobbly) semi circle. Since the bag was simply an accessory I didn't go to any lengths as far as making it functional.
Now that you have your flap cut out and your straps cut to size, we can attach them to the bag. Lay the bag "face" up, you will be sewing along the inside top open edge. the red rectangle is the back panel of the bag. Place the two strap ends (green rectangles) on top of the inside edge of the panel, about 1.5" down. Lay the semi- circle panel (purple rectangle) on top of the straps, lining up the straight edge of the panel with the ends of the straps. Sew 1/2" in from the ends of the fabric layers (blue line).
Sew the bottom of the straps to the corresponding bottom corners of the bag.
And you're done!! Well, with your Dora Bag...
Good news is, you get to follow a lot of the same steps for the Diego Bag.
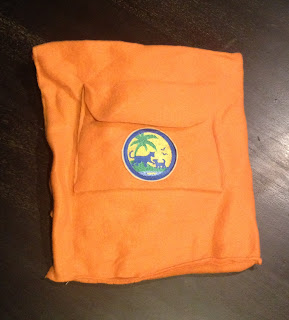
Make the same box-y shape bag as you did for the Dora Bag (except in Orange).
I added a pocket to the front, because it looked kind of plain, but that is up to you. Print out another Diego Badge and glue it to the front of the bag.
For the front pocket:
It is basically an envelope shape. Take a 6" x 20" fabric rectangle, use chalk to divide the rectangle longways into 8"-8"-4". Fold the bottom 8" section along the chalk line.
Once you have your fabric folded, you are going to lay it onto the front of your box-y bag. When you have it positioned just the way you want it, sew along the bottom three edges, but not along the top edge. The 4" flap should lay nicely over the top opening.
The strap is almost like the straps made for the Dora Bag, just longer and positioned differently.
Make the same strap as described above, but lengthen the strap to be 25". Use the same attachment method for the top and bottom of the strap as described above, connecting the top and bottom of the strap on opposite corners.
So there you go! I hope you have a great time making costumes this year! Please let me know if you have ANY questions, and if you end up sporting the Dora and Diego look this year, please send me pictures!!
-Lauren


.jpg)

.JPG)
.JPG)


.JPG)
.JPG)


