Friday, October 25, 2013

Bisbee 1000


Bisbee 1000
"The 5k that feels like a 10k!"

Last weekend I ran in my very first Bisbee 1000 race! If you don't know what this is, here's the breakdown:

Its held in Bisbee, Arizona, an ultra small hidden town near Tombstone, Arizona (and about the same size). The race is a fundraiser for the town of Bisbee, that funds multiple elements of the community. 


The run is a total of 4.3 miles, including 9 staircases! 


Each staircase has what the community calls" Tattoos" on the walls of the entrances. The artwork varies with each staircase, showing a wide range of beautiful artwork.

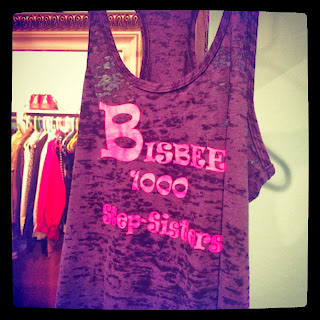
This year we had T-shirts made for our team, created by one of our team members


Upon finishing, each finisher received a medal from the race staff. Very cool memento for the experience!


 The run was AMAZING, but the party at the finish was a great motivator to get across the finish line! Ever year, Bisbee hosts a Beer Garden at the finish (and you get a sneak peak during the run!)


We decided to get a table at a restaurant just off of the finish line at Screaming Banchee. We were able to get our fill of beer and carbs after the race.


Here are a few of our post race pictures:


Go ASU!
I missed all Homecoming festivities to be at the race, so I had to show a little spirit :)

And of course we had to sniff out the sweets, I mean, we worked so hard to earn them! About a block away from the finish we found a small chocolate shop, appropriately named "Chocoláte"


 Some of the extremely wonderful chocolate we bought :)


We checked our times as soon as they became available, turns out we completed the race faster than my family had last year!


I logged the race using my Nike+ app. and here is the course. Kind of crazy! We were sore in some odd places, but it was worth every wince. 


We cant wait to go back next year, this trip has been inducted into our family tradition!

Thank you for reading!
- Lauren


Sunday, September 15, 2013

Couple Costume - Dora and Diego

Halloween 2010, our first fright night together.


Since we were often held hostage to our princess watching her man Diego, we decided that it would be fitting to dress up as her favorite adventure duo.
This is a super easy couple costume to pull together, the only things I made were the backpacks. 


For Diego:
Light blue short sleeve t-shirt
Dark blue shorts
Dark tan fishing vest, attach logo (below)
*Print out the logo at 3" x 3" on thick cardstock. Cut out the logo. Use spray glue to attach to left side pocket on the fishing vest.
For Dora:
Dark pink shirt
Golden rod or orange shorts
White shoes
Yellow socks
Hair: straighten and curve into a bob


The Backpacks:
I really just created these backpacks as I went, but I will try to explain how they went together as best I can :)

Dora's Backpack

The shape is basically a rectangular box, with the top side left open.

 The panel measurements:
 Two panels (front and back) that measure 10" x 15" 
Two panels (sides) that measure 3" x 15" 
One panel ( bottom of bag) that measures 3" x 11"
*I have color coded the different panels, hopefully this will help the sewing make more sense in how I explain everything.


Here is a view of the corner of the bag, again it was a very rough and quick version of a box-y bag.
I started with one panel, and sewed two sides along the length of the panel. 

Then I sewed the other panel opposite of one side. It should now look just like the diagram above. Now place front sides together and sew the outside edges together. You should now have a three dimensional rectangle box, with no top or bottom.

Then comes the tricky part, which is getting the bottom on. Keep the box inside out, and stand it on end. Fold back 1/4" of fabric and pin. Position the bottom panel evenly on the end of the box, and pin the panel edges to line up with the folded edges that you already have pinned back. The panel edges and the pinned edges should now be pinned together.Take one edge at a time, and sew together along where you have pinned, at 1/4" back from the edge. When you finish, turn the box right side out, and you should have a rectangular shape box-y bag with no top. 


The straps measure 6.5" x 7", i sewed the 6.5" sides together and turned them inside out to created a more realistic looking strap. I sewed on an extra piece of ribbon for decoration, but if I did the backpack over again, I would just make the 7" length into 18" or maybe longer.

Once you have made the straps, set them aside while you cut out the top flap. You are welcome to get more creative with it, but on this bag I simply cut out a (very uneven and wobbly) semi circle. Since the bag was simply an accessory I didn't go to any lengths as far as making it functional.

Now that you have your flap cut out and your straps cut to size, we can attach them to the bag. Lay the bag "face" up, you will be sewing along the inside top open edge. the red rectangle is the back panel of the bag. Place the two strap ends (green rectangles) on top of the inside edge of the panel, about 1.5" down. Lay the semi- circle panel (purple rectangle) on top of the straps, lining up the straight edge of the panel with the ends of the straps. Sew 1/2" in from the ends of the fabric layers (blue line).

Sew the bottom of the straps to the corresponding bottom corners of the bag.

And you're done!! Well, with your Dora Bag...

Good news is, you get to follow a lot of the same steps for the Diego Bag.

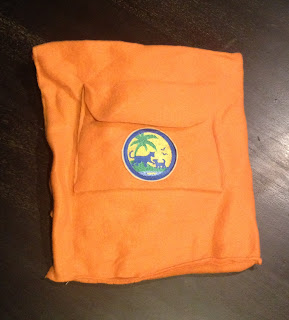
Make the same box-y shape bag as you did for the Dora Bag (except in Orange).

I added a pocket to the front, because it looked kind of plain, but that is up to you. Print out another Diego Badge and glue it to the front of the bag.


For the front pocket:
It is basically an envelope shape. Take a 6" x 20" fabric rectangle, use chalk to divide the rectangle longways into 8"-8"-4". Fold the bottom 8" section along the chalk line.
Once you have your fabric folded, you are going to lay it onto the front of your box-y bag. When you have it positioned just the way you want it, sew along the bottom three edges, but not along the top edge. The 4" flap should lay nicely over the top opening.

  
The strap is almost like the straps made for the Dora Bag, just longer and positioned differently.

Make the same strap as described above, but lengthen the strap to be 25". Use the same attachment method for the top and bottom of the strap as described above, connecting the top and bottom of the strap on opposite corners.


So there you go! I hope you have a great time making costumes this year! Please let me know if you have ANY questions, and if you end up sporting the Dora and Diego look this year, please send me pictures!!
-Lauren

Signature Board

My little brother has recently pointed out that " giving people cards is out of style". So how do you tell someone happy birthday/ congratulations/ wishing you well in a way that's a little more "COOL"? 
Enter, the Signature Board. 

I made this one for a friend's graduation party (Go Devils!!) and it was the perfect way to commemorate their achievements in a really special way.  

Arizona State Signature Board

What You Need:

One 16" x 20" Frame (I got this one at a yard sale, & spray painted it to get the color I wanted)
One yd. 2" wired ribbon
1/2 yd. 1" ribbon in a corresponding color
Pre-cut mat board in a color corresponding to your ribbon colors
Two pieces of thick white cardstock, cut to the same size as the mat board
Picture of the recipient

1.
When you purchase the mat board, usually you can get it cut to size in the store you purchase it from. I buy mine at Hobby Lobby, where I can take it to the framing counter and they cut to size and cut out the picture hole. The size I have found to be best for the picture hole is 5"x 7", and it leaves plenty of room for signing the board around the photo. It helps to have the picture you are using already picked out, so you know whether to have the hole cut portrait or landscape.

2.
Remove the glass and all backing from the frame, and set aside. Place the frame on your work surface, face-down. Insert the pre-cut mat board into the frame. Now place the picture, centered in the mat board hole, and secure with acid free tape. Place the cardstock on top of the picture, and then any backing that came with the frame. Last to go in is the glass, and then one more piece of cardstock to protect the glass. When you push down the tabs around the back of the frame that hold everything in, everything inside of the frame should feel really tight. If you are able to wiggle the contents of your frame, add more cardstock until everything feels more secure. 
3.
Turn your frame face up on your work space. Use the wired ribbon to create a large bow. Create a smaller bow with the 1" ribbon, and layer inside of the large bow. Leave one extra long tail on the 1" ribbon bow, and use this for attaching a signature pen. Attach your big beautiful bow to a suitable corner of the frame, preferably at the top since the pen will need to hang down the side. 

4.
When the event is over, move the glass from the back of the frame to the front. This will prevent any writing from getting smeared. It also makes the frame ready to hang with pride in it's new home!

Highland High Signature Board


Friday, July 12, 2013

More Than Just Finger Painters - My Business Goal

As a design student, I have often heard that designers aren't the best at putting projects together on a construction level, they only know how to make it look pretty. Well, I do happen to be earning a 50K degree in "How to Make Things Pretty", but I hope to also change how others perceive what I do. Architects often depict us as designers like this...


Grown-Up Kindergartners.

In some cases I agree, this may be true. But for the MAJORITY of the time, 80% false. Yes we love colors and we know how each and every one will make you feel inside, but I'm here to tell you that our work is not as easy as the untrained eye might see it be.

My main focus for the future in the "Real World" as they call it, is to change the way others think of designers. Not just by telling, but showing the way that designers can implement building techniques into the designs by actually getting dirty. My father put a hammer in my hand as soon as I could walk and building has been a very big part of my life ever since. However, I had no desire to work as unskilled labor for the rest of my life, so first step was to go out and get my degree. And as miracle would have it, I was accepted into the Interior Design program at Arizona State University this summer. In my first year working towards my milestone portfolio I learned how valuable my background in construction was to my success.

 For instance:


We were assigned a designer to draw inspiration from, and were to design a space using the characteristics of that designer's work. In my design I included a set of French doors, which for the size of the space seemed kind of odd to my professor. So she asked me about my design and why I chose this route for my interior space. I explained to her that I had designed the space in circular forms and therefore the bed in my interior was to measure 8 foot in diameter. Still not understanding what the bed had to do with the door, I went on to explain. After the completion of the building, in order to fit the bed into the room at its specified place there would need to be double doors in order to actually get the bed into the room. She then let me know that I would do just fine in the program.

In design we run into these issues where we need to think deeper about the space and what needs to happen for it to be successful. As an assistant to my father who works as a general contractor, I have often had to deal with these issues first hand. I've seen beautiful designs get contorted due to simple details not being recognized by the designer, which could have been prevented if that designer had just done a little research to find the distance between wall studs. As a future predecessor to my fathers residential construction business, I plan on being the beauty and the brains in order to get the job done to the highest satisfaction of the client. It can be easy to point your finger and say what looks good and how far to the left it needs to be, but I feel that involving yourself knee-deep in your work is the only way to get to that above and beyond level of precision.


This creative plan is a submission for the ModernAbstractDecor and NicholasYust "Students of the Arts" scholarship.